How to Save Time Preparing 1099s – QuickBooks Training Tip
December 16, 2011 by Ed Becker
Want to save time this year preparing 1099’s? If you are a QuickBooks user, you’re in luck. Follow this simple QuickBooks training tip to make 1099 preparation as efficient as possible.
In order to print out accurate 1099 forms at the end of the year using your QuickBooks software, the first thing you’ll want to do is to make sure that you have chosen the right options within the 1099 settings of QuickBooks. Complying with the IRS’s 1099 rules is a small business bookkeeping best practice and QuickBooks makes compliance straight forward so why not take a few minutes to get these steps right?
Step 1: From the “Edit” drop-down menu, choose “Preferences.”
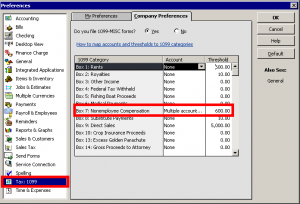
Step 2: On the preferences screen, choose “Tax: 1099” from the left menu options. (see screenshot below)
Step 3: Find “Box 7: Non Employee Compensation” on the right side of the Preferences window. (also shown in screenshot below)
Step 4: Enter $600.00 into the threshold column for this item.
Step 5: Select an account or multiple accounts that will be used for recording your 1099 payments. The account selections are a critical part of your 1099 setup. The accounts need to be selected (mapped) in order to be picked up in the totals for the 1099s. See below for some common choices.
Examples of common accounts to select are:
- Subcontractor
- Cleaning services
- Professional fees
- Outside labor
- Consulting
Once you have mapped your accounts and set your threshold, you need to verify that you have all your settings set correctly by running a 1099 report (see Step 6).
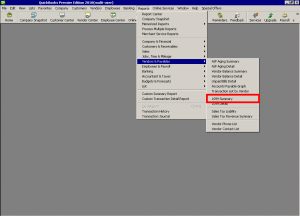
Step 6: Run the 1099 Summary report, which can be found under your Vendor & Payables reports as shown in the screenshot below:
Run one report with all vendors and ALL accounts and one with only 1099 accounts. Comparing these two reports should help you to see if you missed any accounts in your 1099 preferences setup. The total amounts for your 1099 vendors should be the same on both reports. If they are not the same, you may have missed some accounts that should be included in your 1099 account setup.
Remember, if you don’t list an account in the 1099 setup (see Step 5 above), that account won’t be included in QuickBooks’ 1099 reports.
After you have reviewed the reports and made sure everything looks accurate, you are ready to print your 1099s. Forms must be distributed by January 31 each year. Obtaining the necessary information to complete these during the year is one small business bookkeeping task that can lessen the burden at year end.
Hopefully, the above QuickBooks training tip helped save you some time this year. If you have a question, leave it in the comments below or contact me via one of the methods listed on our small business bookkeeping website.
Category: CPA, Small Business, Software
Tags: accounting, QuickBooks, small business, software, tips, training


